Friday, April 12, 2019

Handwriting the DO's and the DON'Ts

Image result for small pencils


HANDWRITING THE DO’s AND THE DON’Ts 

When kids are first learning to colour you may use jumbo or thick crayons and pencils to begin with. Kids often need less strength and coordination to hold a thicker framed crayon. Toddlers tend to use their entire arm to colour whilst laying on their tummy’s which helps them to start using their fingers instead of their shoulder. Jumbo or thicker framed crayons or what I like to use 'crayon rocks' (see below) are heavier and are more appropriate for younger kids from 1-3 years to make marks on paper.

Image result for crayon rocks
Check it out: https://www.amazon.co.uk/Crayon-Rocks-Colours-Red-Velvet/dp/B002EODQBA

As kids get older and their fine motor skills develop, they begin to use their fingers and wrist more to move a crayon or pencil. This is due to increased shoulder stability which is a natural progression. Generally between the ages of 3 and 4, kids should begin to rest their arm on the table and start using the small muscles in their hand to do the work.  

Kids from 3 years onward should still use a short crayon and pencil so their is less risk of them holding it in an inappropriate grasp- the more space the more room for incorrect positioning. 

Using a golf pencil or shorter pencil enables kids to manipulate the pencil or crayon more easily. This  discourages them from using too many fingers, putting too much force on the pencil and from colouring outside the lines. 


                                                    Image result for short or gold pencils

Kids often have weak muscles in their hands and that is often the most common problem with handwriting issues and not being able to write coherently and easily in an appropriate pencil grip. Kids compensate for this weakness by using as many fingers as possible to hold the pencil. So instead of engaging kids in lengthily pencil tasks maybe mix it up with some fine motor strengthening activities that are often a lot more fun than pencil work! I post hand and finger strengthening activities regularly on my Facebook and Instagram pages @occupationaltherapyabc (see link on right column)

So... what do I recommend kids use for handwriting? 

Below I recommend a few different strategies to promote an appropriate pencil grip. A good place to start is taking a multi-sensory approach which incorporates a more hands on approach. I also recommend a few different crayons that will promote your kids pincer grip, please note regular crayons are also fine! The below can be found on www.learningwithouttears.com

Stamp and See Screen®


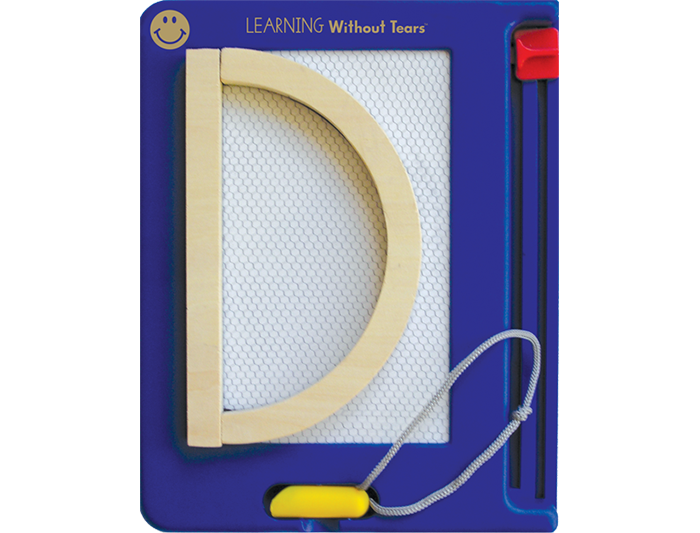
Stamp and see screen: Build capitals and numbers using "Wood Piece" stamps. Magnetic, chalk-like writing tool helps develop grip
Check it out:
 https://shopping.lwtears.com/product/SAS/handwriting 


Wood Pieces Set for Capital Letters

Wood pieces set for capital letters
Make pre-writing instruction easy. Children learn capital formations as they imitate the teacher piece by piece. Use the set for teaching size, shape, position words, and concepts, too!
Check it out: 
https://shopping.lwtears.com/product/WP/hwtmultisensory


 FLIP Crayons® Gift Set

Flip crayons are available from Learning without Tears. These are greaat to promote a proper grip and fine motor skills by flipping the crayon. 
Check it out: 
 https://shopping.lwtears.com/product/FGS20/handwriting

What can you do to help your kids pencil grip? 

Engage your kid in strengthening activities examples include theraputty exercises and tennis ball strengthening activities (check out my Instagram page)! Find motivating activities for your kid by getting them to practice colouring their favorite cartoon character (so many free printable material online). 

If your kid refuses point blank to engage in colouring tasks, don’t panic! Colouring is one part of fine motor tasks but fear not there is plenty of activities that can compensate. Although colouring is an important fine motor skill and is important for grasp development and finger strengthening, kids often refuse to colour because of the lack of strength. So maybe start there, help them increase the strength of their muscles instead of jumping into coloring activities that can be quite taxing on their little muscles. Theraputty, Play-doh etc are great for strengthening the muscles in the hands and fingers! In addition, it’s important they have sufficient shoulder stability in order to engage in colouring or handwriting activities. The aim is to get your kid to use their hand without using their whole arm! Encourage your kid to colour or engage in fine motor tasks while lying on their tummy. This can feel uncomfortable at the start but keep at it. 

Roll–A–Dough Letters®

Roll-A-Dough Letters
It's fun to roll and cut dough snakes to make capitals and numbers! Use the blue tray with sand, shaving cream, or rice for additional practice. Set includes: 18 double-sided capital and number cards, tray, and dough.
Check it out: 
https://shopping.lwtears.com/product/RAD/products-by-type 


I really hope this has been helpful! If you have any questions please share them below! 
SHARE:

Thursday, April 11, 2019

Sensory Room on a Budget


Image result for sensory rooms


Creating a cost-efficient sensory room can easily be done when you do your research and know what products are worth buying and will actually make a difference to your kids’ life and development. Unfortunately, many families with loved ones who would benefit from access to a sensory room often don’t feel they have the necessary funds or space to create one. In short for those unaware, a sensory space or room is a special area which combines a range of stimuli to help individuals develop and engage appropriately in their senses. These can include colours, lights, sounds, sensory objects all within a safe environment that often helps kids to regulate and feel calm.

However, the point I want to make today is that you don’t need huge funds or endless space to create a budget friendly sensory place. Here are some tips that I hope will help you out!


             1. Consider what your kid needs 

Every child is wonderfully different and unique and like anything else have different desires and needs therefore the first step in creating a sensory room or space is think about the kid who will actually be using it. The sensory space should meet their particular needs so take note of some of the toys they seek comfort in that might be therapy items ad sensory activities your kiddo enjoys for example does your kid find theraputty or play-doh therapeutic? Does your kid find slow moving lights and noise soothing? Does your kid enjoy playing with fidgets and squishy toys? Does your kids find weight e.g. blankets or vests regulating? Include what your kid already finds beneficial in the sensory space. Speak to your kids therapist if they have one on what your kid likes working on in therapy sessions.

    2.  Finding the right space

I don’t always like the term ‘sensory room’ as it can be misleading. In order to create an efficient and appropriate sensory space often does not involve including an entire room. Most families do not have an entire room in their home in which they can adapt into a sensory room and that’s okay. Smaller sensory areas can be just as effective as bigger ones. I would recommend thinking about any quiet space you do have whether that be a corner in a bedroom or sitting room or playroom. Think about how you can utilise this area and make it individualised for your child. Can you make space if there isn’t already obvious room by moving furniture etc? Maybe there is a wardrobe or furniture you are not using that could be moved to make space for a sensory area? Another idea is to make a sensory tent where your kid has lots of privacy in their sensory space.

   3.  Check out some funding options

Sensory equipment is expensive we all know that but instead of purchasing brand new equipment or products why not do some research online for second hand equipment or charities that might have some more reasonably priced products. In addition, sensory rooms don’t always need to include expensive sensory equipment. Websites like Amazon and eBay often have much cheaper sensory products like sensory lights and toys compared to other websites, it pays to do some research and compare prices.  

Always remember, building a sensory room is a process. Rome was not built in a day nor should your sensory room. Take your time and enjoy the process, add more along the way especially when you start getting a better idea of what your child might enjoy in a sensory room. There is no need to rush it as starting small will allow the sensory space you create to evolve with your kids needs.

         4. Recommendations for a sensory space 

As I have said above all kids are different and all require different inputs to meet their individual needs but here are some recommendations that I think really add to a sensory space.

Firstly, I love the idea of a dark space, this can be a room with dark blinds so little sunlight or a dark tent. Sensory lights work well with dark spaces and can be very regulating and soothing for a kid. Lights can come in the form of a bubble tube or fiber optic sensory lighting which is polymer strands that change colour as they light up, these can be used for relaxation, visual and tactile stimulation. Cheaper sensory lights include sensory eggs, disco lights and globes.
Related imageRelated image


I also like to include some comfortable seating in the form of a big squishy bean bag! Kids need to be comfortable in a sensory area to feel completely relaxed and at ease. Bean bags can give input and can be so snug to sit or lie in! I also love a cloud chair which includes vibration combined with music for extra soothing and comfort.
Related image
Image result for crash mats sensory roomI think if you have a big space in particular, make sure that it is lined with crash mats. Firstly for safety as kids often like to roll and tumble as they please. Also its beneficial to include a variety of textures on the floor including a rice path, grass flooring etc.


Fidget toys are also great in sensory rooms as they provide regulation for those sensory seekers.
Image result for fidget toysIf you have extra space ball pools are amazing for tactile, visual, auditory and proprioceptive feedback to help build confidence and strengthen sensory motor skills.


Thanks so much for reading, please leave some comments about sensory spaces below J


SHARE:

Sunday, March 3, 2019

Pre-writing skills tips and tricks!

Image result for pre writing skills for kids


Pre-writing skills are the fundamental skills children need to develop before they are able to write appropriately. These skills help the child to hold and use a pencil, and the ability to draw, write, copy, and colour. Pre-writing skills promote the child's ability to move a pencil fluently and effectively making handwriting more legible.  A major component of pre-writing skills are the pre-writing shapes. These are the pencil strokes that most letters, numbers and early drawings are comprised of. They are typically mastered in sequential order, and to an age specific level. These strokes include the following strokes: |, —, O, +, /, square, \, X, and Δ.


What are the components needed to develop writing readiness (pre-writing)?
1. Hand eye coordination which involves coordinated control of eye movement with hand movement and the processing of visual input to guide reaching and grasping along with the use of proprioception of the hands to guide the eyes.
2. Hand and finger strength: Necessary muscle power for controlled movement of the pencil.
3. Crossing the mid-line: The ability to cross the mid-line is important on the physical level as well as on the brain level. On a physical level, when your child spontaneously crosses the midline with the dominant hand, then the dominant hand is going to get the practice that it needs to develop good fine motor skills.
4. Visual perception: Brains ability to interpret visual information seen by the eyes like letters and numbers.
5. Pencil grasp: The efficiency of how the pencil is held, allowing age appropriate pencil movement generation.
6. Bilateral integration: Ability to coordinate both sides of the body at the same time in a controlled and organized manner; for example, stabilizing paper with one hand while writing/ cutting with the other.
7. Hand dominance: Preference for using one hand over the other to perform fine and gross motor tasks. This includes activities like writing, cutting, and catching and throwing a ball.
8. Shoulder and arm strength: stability provided by the shoulder to support controlled hand and finger movements for good pencil control.
9. In-hand manipulation: ability to move objects around in your hand and hand division using the thumb, index and middle finger for manipulation with the ring finger and little finger tucked into the palm allowing for palm stabilizing while writing.


What activities can help pre-writing skills:

Threading and lacing (grade activity by starting bigger beads) 

Image result for threading kids


Theraputty exercises 

Image result for theraputty


Construction: Building with duplo, lego, mobilo or other construction toys.
Image result for lego


Pre writing shapes: Practice drawing the pre-writing shapes (l, —, O, +, /, square, \, X, and Δ).


Image result for writing development BY AGE

Tweezers and pom poms


Image result for tweezers and pom pom


Writing on a vertical surface

Image result for slant board for writing

Art and crafts activities

 Image result for art and crafts activities

Everyday finger and hand strengthening activities like opening jars

Image result for opening jars kids


SHARE:

Thursday, February 14, 2019

Theraputty- the hand workout!


Image result for theraputty


What is THERAPUTTY?

Theraputty has multiple uses and is a popular exercise putty used by Occupational Therapists (OT). It is similar to playdough however it is non oily, brightly colored, non-toxic, non-sticky putty which is fun to mold and stretch, hide coins or small toys and play hide and seek! It not only works on a variety of skills such as dexterity, improving grip strength, hand strengthening through finger, hand and wrist resistance exercises but it is also lots of fun!

Theraputty comes in its own plastic container and in various grades of firmness ranging from XX-soft to X-firm. It is recommended that you use the colour your therapist recommends or start softer until your kids builds up their hand strength and skills. The levels of resistance or firmness are colour coded as follows (this may vary depending on brand):

theraputty-strengths

Theraputty takes the shape of whatever container it is in, a 'gravitational' material; leave it in the container when not in use as it can stick to clothing etc and can be difficult to remove. 

Why use Theraputty? 

There are many uses of theraputty including building hand and finger strength which helps kids develop their handwriting grip or grip for dressing skills e.g. closing or opening buttons.

Theraputty improves dexterity and fine motor skills often after hand injury. Theraputty is often used as a calming manipulative tool and as a distraction tool or fidget option.

Theraputty is also used during sensory play and can provide sensory tactile input, which can help to calm kids by allowing them to self-regulate. Carrying out the following hand activities prior to fine motor or drawing tasks helps the child’s hands prepare for activity. The exercises are aimed at increasing the tactile and proprioceptive sensory messages the child receives from their hands. By doing this the child will have an increased sensory awareness of what their hand muscles and joints are doing


Theraputty activities:
Image result for beads hidden in theraputty


  1. Flatten theraputty with your fingers/palm to make a pancake
  2. Hide beads or coins in the theraputty then allow your child to seek them out (like a treasure hunt)
  3. Roll a sausage with one hand (benefits hand dominance)
  4. Roll a sausage with two hands (benefits bilateral coordination)
  5. Chop up the theraputty with a scissors and 'feed' the cubes of theraputty to an animal teddy!
  6. Pinch the theraputty between your index finger and thumb (pincer grip)
  7. Roll out the theraputty then contruct the letters of your name
  8. Put a ball of theraputty on your palm and squeeze the ball using thumb and fingers
  9. Did you read my blog post on pciky eating, well if you did you'd remember one of the major steps in overcoming picky eating is food play with a variety of textures, why not make a dinner with the theraputty? you could add toppings to the 'pancake' or make a pizza base then pinch bits of theraputty off and add them to the top of the pizza!
Image result for beads hidden in theraputty


Below I have included therapy exercises: 

untitled-design1untitled-design3untitled-design2

Click here to get the PDF:
https://patienteducation.osumc.edu/Documents/thra-put.pdf

SHARE:

Tuesday, February 5, 2019

The Oral Sensory System


Image result for oral sensory input

ORAL MOTOR SENSORY INPUT

Some kids struggle with processing and responding to the oral sensory information they encounter and experience in everyday life. They may be hypersensitive or under sensitive to oral input, causing them to be resistant to oral sensory experiences like trying new foods or brushing their teeth.

How it works:

We all have sensory receptors in our mouths which allows us to perceive sensations like texture (smooth/crunchy), temperature (hot/cold) and taste (sweet/sour etc). Our brains also receive proprioception (another sensory system) for example from the joint in our jaw as we chew different foods with different textures e.g. a chewy sweet, a pretzel etc. Oral sensory processing
also impacts the way we move our mouth (e.g. talking), control our saliva, and produce sound for speech.


What is healthy oral sensory processing?
Kids with healthy oral sensory systems generally are not fussy eaters and eat a variety of foods with a combination of different tastes and textures.They are often willing to try new foods within reason and can tolerate eating foods with a range of textures and tastes. In addition, kids with healthy sensory processing can tolerate tooth brushing and visits to the dentist with little complaint. They do not seek excessive input into their mouth to regulate like biting or chewing objects.
What are some of oral sensory processing problems?
As said above, some kids struggle with processing and responding appropriately to oral sensory input they encounter in everyday life. If they experience a heightened response to sensory oral input kids often avoid certain food textures and can be described as 'fussy eaters' and often have limited diets. In addition, these kids may refuse to use cutlery as they dislike the feeling of a spoon or fork in their mouths.This resistance to oral input can be accompanied by emotional outbursts, making mealtimes a stressful place for all! Kids are often referred to specialised feeding clinics to help them overcome this issue.
On the other hand, children can experience decreased sensitivity to oral sensory input (hyposensitivity).  These children may require more oral sensory input in order to help them organise their behavior and pay attention. Examples of this include kids who may chew, bite or mouth non-food items like hands, wrists, clothing, pencils, toys to mention a few. These kids are constantly looking for oral input to help them regulate. They may even make clicking, buzzing or humming noises to increase oral input.  
Having the right and most appropriate intervention in place is paramount, client centered intervention is usually recommended by an OT. Here I share some general tips and tricks and activities I often recommend to parents when faced with this issue. Please note these activities are not specifically recommended for your child. 
Oral sensory input can affect a child’s levels of arousal and potentially even change behaviors, helping a child become more regulated and engaged in everyday life.
Alerting Oral Sensory Activities for the kids that are hyposensitive 
These activities provide the sensory input kids need to focus and attend better at home and at school. 
    Image result for mouth vibration toysImage result for blowing bubbles
  1. Vibration (electric/vibration toothbrush, vibrating toys on cheeks/lips)
  2. Blow bubbles
  3. Drink a thick liquid (smoothie etc) from a straw 
  4. Eat crunchy foods e.g. carrots, nuts, apples, chips, pretzels, popcorn, raw veggies, toast, graham crackers, granola
  5. Eat chewy foods e.g. dried fruit
  6. Suck on hard sweets/chew gum
  7. Eat cold foods like ice pops
  8. Make an edible necklace with cereal etc
  9. Blow bubbles in water with a straw
  10. Blow out candles
  11. Whistle or hum to a song
  12. Roll tongue into a circle
  13. Play straw games (use a straw to blow objects across a table)
  14. Play with making faces with a handheld or imitating others’ funny faces: open mouth wide, sticking tongue out, smiling, frowning, filling cheeks up with air
  15. Eating snacks with sour/sweet tastes e.g. chewy sweets, lemon, lime or grapefruit
  16. Eating salty snacks (e.g. chips, pretzels, nuts) -Snacking on cold foods (e.g. ice chips, popsicles, frozen grapes)
  17. Trying snacks with intense tastes and temperatures e.g. add spice to food

Calming Oral Sensory Activities for the kids who are hypersensitive
Image result for sucking a smoothie from a strawCalming oral sensory activities can help to calm the body  by helping kids to remain in a regulated state so that they can engage appropriately in everyday life.
  1. Sucking thicker liquids like milk shakes, smoothies through a straw
  2. Drinking from a water bottle with a straw that requires sucking
  3. Resistive chewing e.g. chewy sweet
  4. Dried fruits, fruit roll ups,, marshmallows, oranges, raisins
  5. Blowing bubbles, blowing up balloons, or blowing whistles and other instruments

Oral Sensory Toys
Chewy tubes Ps and Qs
What are your favorite oral sensory tips and tricks?  Would love to see some more ideas in the comments below! :) 

SHARE:
Blog Design Created by pipdig